White TRD Kitted MR2
Page 1 of 1

White TRD Kitted MR2
![]() JDModified Tue Jul 10, 2012 8:03 am
JDModified Tue Jul 10, 2012 8:03 am
Here i will be posting the progress of one of our customer's MR2's which we have had in for a freshen up..
I will go from the beginning right up to where we currently our with the project
*Some parts will be copied and pasted from another forum so apologies if certain points dont make perfect sense *
*
So this car came into us requiring all bodywork issues to be repaired,along with various other modifications such as bigger brake set up,coilovers and also a full respray..full details of parts and work carried out will be detailed.
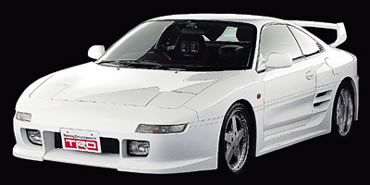
This is how the car originally looked:

The first step was to key the full car with 1200grit wet n dry sandpaper to allow us to find and identify any problems.

Here is a few pictures to show just some of the various parts of the damage we found:


to start with the car had a full underseal and polybush kit fitted, along with BC Racing coilovers.


then we began to fit D2 Brake upgrade:
the rear shields had to be removed due to the size of the new discs:


we then did a test fit of the new wheels to check clearances etc before tyres were fitted


tyres fitted


front and rear comparison

inner arch work was needed due to the tyres catching very slightly:


wheels then fitted(suspension hasnt been set up yet)


The next stage was to begin the bodywork stage..so that it makes sense from the start-the front wheels were too wide for the kit,so we decided to widen the kit even more to make it unique

Stage2 was to make brackets from Aluminum (so not to rust) so to pinit in shape and create strength.
Then reset all the angles after pulling them offset 1half inches due to widening.
Then add wire mesh to catch the fiber paste and add strength also, add glass matting for extra strength and shoe lace it together ready for topstop.

Next stage after this was to shape and fill with filler


the process was then repeated for the opposite side:


once this was complete, the engine bay was then prepped for paint and primered:


then painted


and how the front end was looking before primer..nice and wide

I will go from the beginning right up to where we currently our with the project
*Some parts will be copied and pasted from another forum so apologies if certain points dont make perfect sense
So this car came into us requiring all bodywork issues to be repaired,along with various other modifications such as bigger brake set up,coilovers and also a full respray..full details of parts and work carried out will be detailed.
This is how the car originally looked:
The first step was to key the full car with 1200grit wet n dry sandpaper to allow us to find and identify any problems.
Here is a few pictures to show just some of the various parts of the damage we found:
to start with the car had a full underseal and polybush kit fitted, along with BC Racing coilovers.
then we began to fit D2 Brake upgrade:
the rear shields had to be removed due to the size of the new discs:
we then did a test fit of the new wheels to check clearances etc before tyres were fitted
tyres fitted
front and rear comparison
inner arch work was needed due to the tyres catching very slightly:
wheels then fitted(suspension hasnt been set up yet)
The next stage was to begin the bodywork stage..so that it makes sense from the start-the front wheels were too wide for the kit,so we decided to widen the kit even more to make it unique
Stage2 was to make brackets from Aluminum (so not to rust) so to pinit in shape and create strength.
Then reset all the angles after pulling them offset 1half inches due to widening.
Then add wire mesh to catch the fiber paste and add strength also, add glass matting for extra strength and shoe lace it together ready for topstop.
Next stage after this was to shape and fill with filler
the process was then repeated for the opposite side:
once this was complete, the engine bay was then prepped for paint and primered:
then painted
and how the front end was looking before primer..nice and wide
JDModified- Posts : 5
Join date : 2012-07-09
Re: White TRD Kitted MR2
![]() JDModified Wed Jul 11, 2012 3:22 am
JDModified Wed Jul 11, 2012 3:22 am
The car was skimmed more or less all over to insure a smooth finish all round:


then due to original mr2 trims never fitting right,we decided to put our own twist on them to make sure all the lines were perfect:


then due to original mr2 trims never fitting right,we decided to put our own twist on them to make sure all the lines were perfect:
JDModified- Posts : 5
Join date : 2012-07-09
Re: White TRD Kitted MR2
![]() JDModified Wed Jul 11, 2012 3:38 am
JDModified Wed Jul 11, 2012 3:38 am
Then the car had its first lot of 2k high build primer..it was then dusted black over the full car before being rubbed down DRY with 180 grit..


it was then dust coated in red, which was rubbed down DRY again with 320 grit then any defects etc that we wernt happy with were addressed with green ayric stopper and top stop where needed,finally the final coat of primer with surface sealer was put down and etch primer used where needed:


Windows out and framed stripped clean ready for new bond


JDModified- Posts : 5
Join date : 2012-07-09
Re: White TRD Kitted MR2
![]() JDModified Wed Jul 11, 2012 3:58 am
JDModified Wed Jul 11, 2012 3:58 am
the car was then painted in audi ice white,with high solids lacquer:


under front bonnet was next to have paint put down,and trims etc put back in and wheels back on


under front bonnet was next to have paint put down,and trims etc put back in and wheels back on
JDModified- Posts : 5
Join date : 2012-07-09
» Another TRD kitted 2 on ebay
» Red Mr2 TRD kitted youtube channel
» TRD2000GT #14 (White) *** NEW ***
» TRD2000GT #34 (White)
» TRD2000GT #04 (White)
» Red Mr2 TRD kitted youtube channel
» TRD2000GT #14 (White) *** NEW ***
» TRD2000GT #34 (White)
» TRD2000GT #04 (White)
Page 1 of 1
Permissions in this forum:
You cannot reply to topics in this forum|
|
|